Bear Cruzer G2 Review
In this article, I am going to share with you my findings after completing an extensive review of the Bear Cruzer G2. For this review, I took the item out of the box and mounted the accessories. The box also comes with a handle inside so that you can turn the bow into a bow case. I opened the box from the end like I’ve done any other bow box in the past. However, I came to discover that the Bear Cruzer G2 box is designed to be laid down on its side and opened from the side. Make sure you open the Bear Cruzer G2 box this way if you intend to use it as a portable bow case. Also, keep in mind that this is just cardboard, so it won’t last forever, especially if you are traveling with it.
Another thing I learned about this box was that there was a hidden compartment in the bottom where the stabilizer and wrist sling was located. I actually shot this bow throughout the entire review without them because I didn’t know that compartment was there. The stabilizer and wrist sling are so light that the box simply felt empty once the bow and other accessories were taken out of the box. I imagine that if you open the box from the side, you will easily see the stabilizer and sling, but if you open it from the end you may not be able to see it if you opened it on the opposite side like I did.
I then tested the tuning of the Bear Cruzer G2 right out of the box by shooting an arrow through a paper tuner to see how accurate the flight was. The bow came set at 26-inch draw length, so I did my initial arrow flight test there. I then put the bow on a draw board to see if the cams were properly timed. One cam was hitting slightly before the other, so I set the cam timing. To do this, I added one half twist to the cable on the cam that was coming in contact with the cable before the other. I then put the bow back on the draw board and the cam timing was perfect.
I will also note that I initially attempted to do my adjustments using the Bowmaster Bow Press, but the cams were too large to work properly with mine. I wanted to use that press because it is fairly inexpensive and just about anyone could probably afford one. It should also be noted that my model is 15 years old so it is very possible that newer models will fit it, and people have told me that Bear has it listed as an approved press. Here is a link to the type of press I’m talking about if you want to check it out.
As far as the draw board I was using to check the cam timing, I purchased mine from Lancaster Archery for several hundred dollars. I got it simply because I travel around to many different bow shops doing bow reviews and wanted a way to be able to check cam timing, draw length, and draw weight. If you would like to learn how to make your own draw board fairly inexpensively, you can watch the following video I produced to give you some ideas on it. This is the draw board I used for years before purchasing the above noted one.
If you are not familiar with cam timing, it is simply checking to see if each cam on a compound bow is doing a full rotation and coming fully in contact with the cable or limb stop (limb stops are not applicable for the Bear Cruzer G2). You want each cam to fully rotate and hit the cable in the same way at the same time. If they do not hit in a synchronized way, then the performance of the bow will be decreased. It will typically sound a little louder, shoot a little slower, or could even be less accurate and decrease the overall performance of the bow.
I talk about how to tune the Bear Cruzer G2 in the following video.
If you don’t have a draw board to check the timing of your cams, you can ask someone to look at the cams while you are at full draw. Have them look to see if both cams are coming in contact with the cables or not. This will happen at the flat side of the draw length module that is used to adjust the draw length. If the flattened side of one of the modules is not in contact with the cable while the other one is at full draw, then the timing is out. To correct this, you add twist to the cable of the cam that IS coming in contact with the cable. If you don’t have someone who can look at this for you while you are at full draw, try setting up a video camera and zooming in on the cams if you have to.
If you have to draw the bow yourself to check cam timing, be careful to avoid drawing the bow too hard into the back wall. Basically, draw the bow gently and as soon as you feel contact being made against the back wall, stop there and check the timing. The reason I say this is because it is possible to keep drawing when one cam hits the back wall. You eventually will have the second cam come in contact with the cable. If you look at the bow while pulling harder into the back wall and having both come into contact, then you will be giving yourself a false reading when it comes to cam timing.
Okay, so isn’t this supposed to be a review on the Bear Cruzer G2 and not an extensive post on how to tune a bow? Yes, that is correct. However, many of the people who find and follow my YouTube channel are often new to the sport of archery or hunting. They don’t know anything about bow tuning, so I felt compelled to include the above information to help people set up their Bear Cruzer G2 properly. So now let’s get back to the review on the bow.
After I set the cam timing on the Bear Cruzer G2, I set the draw length at 30 inches and then tested the bow again. I also made sure it was at the peak weight of 70 pounds. The arrow flight was perfect. This means that my bow was tuned for peak performance and ready for the rest of my testing.
Click on the following link to see buying options for the Bear Cruzer G2.
SPEED TEST AT EACH DRAW LENGTH
The following video depicts the recorded version of this review. I’d love it if you would subscribe to my YouTube channel and click the bell icon and choose to be notified every time I do an upload or go live.
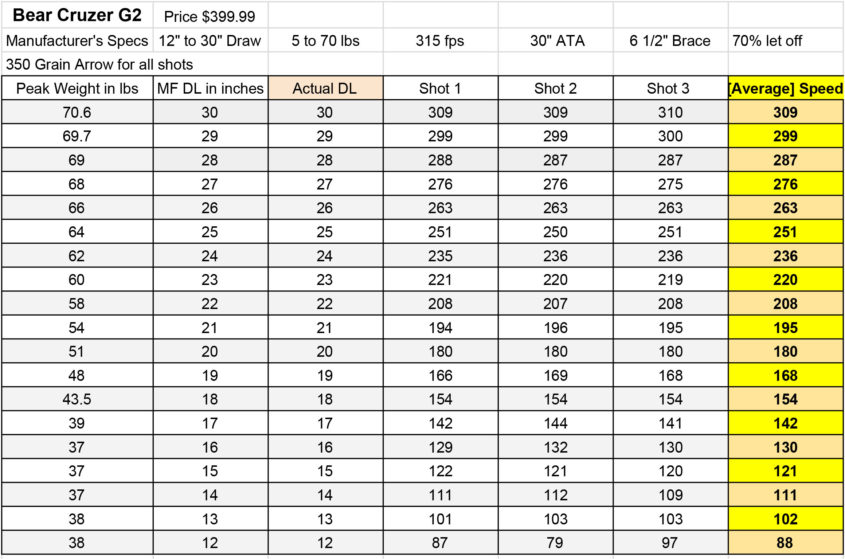
Going into this test, I planned to shoot a 350 grain arrow, at 70 pounds, at every draw length available. For the Bear Cruzer G2, this meant I would test it at 12-inch draw length all the way to 30-inch draw at one-inch increments.
Please note that change the draw length of this bow in half-inch increments, you have to take the module completely off and put a separate one on. This is a little annoying if you buy this bow for a young person who is going to be growing and changing a lot. Rather than be able to just loosen a few screws, rotate the module and tighten it back down, you have to take it off completely. You will be doing this for years, so make sure you don’t lose that second set of draw length modules.
There is also a third module for “constant draw.” This setting enables you to hit any of the draw lengths and then shoot. This is a feature most often used in group settings for youth aged children. It enables all of the kids to stop at their own draw length and make a shot. You wouldn’t use this module if you were setting the bow up for yourself or your child because there isn’t a draw stop at the end of the draw lengths. Not having a draw stop results in inconsistencies when shooting. The reason is that you could slightly increase or decrease your draw length from one shot to the next without feeling that you are doing it. This impacts where your arrow will hit the target in a vertical direction. Still, this is a nice feature to have if you are going to ever be in a situation where multiple people want to try shooting a bow in the same setting. Lastly, there isn’t a drop in draw weight at full draw with the constant draw module, so you typically set the draw weight very low for everyone to be able to pull the bow back.
The following chart depicts the data I acquired while shooting the bow at each of the specified draw lengths. Feel free to copy the image and save it to your computer. However, I only grant this permission for personal use and not for reposting on a platform or place that does not attribute the credit to me and Sean’s Outdoor Adventures and without my written permission.
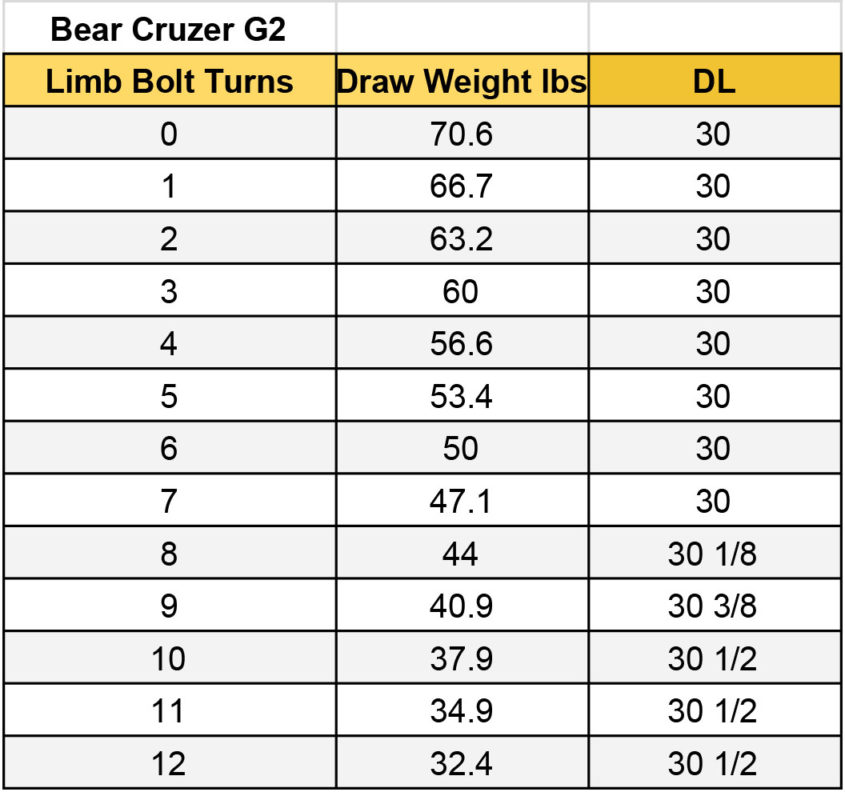
Once I completed the above testing, I tested the draw weight of the bow after each complete turn of the limb bolt. There is a maximum of 12 turns allowed with this bow. The data I collected doing this is listed in the chart below. Once again, feel free to copy the image and save it to your computer or device to look at for your own use. However, I do not grant permission for it to be posted somewhere else unless you check with me and note that the data was provided by me and Sean’s Outdoor Adventures. Thank you for respecting that.
PROS AND CONS OF THIS BOW
When I sat down to write the pros and cons of this bow, I really only thought of the cons. Pros to me are about the same features of any bow. However, I did attempt to note a few pros anyway. Firstly, this bow was shooting arrows that produced perfect bullet holes through the paper tuner right out of the box. The small amount that the cam timing was out did not impact the flight of the arrow, and I was able to adjust the cam timing by simply adding a half twist to one cable. Another positive is that this is a complete bow package that you could target shoot with and also hunt with. It could fit just about anyone with a draw length at or below 30 inches.
CONS – The string dampener, the rubber piece that the string hits after you release an arrow and the string returns to resting position, was not glued on properly and could be easily rotated by hand. It was actually rotated in such a way that the cables were coming in contact with it, and that could throw off the speed and performance of the bow. It is also possible that the rubber piece could come off of the bow while hiking through the woods to a hunting spot. That would be very problematic as the string could be damaged hitting the post that the rubber piece is mounted on.
Another potential drawback with the Bear Cruzer G2 is the failure of the rubber tubing on the peep sight. When I was younger, I had a friend whose peep sight was the same style as the one on the Bear Cruzer G2 and the tubing for the peep sight began to dry rot. Unfortunately for my friend, he noticed it while we were in the woods filming a hunt. He bit the end of the tubing off with his teeth and pushed the remaining tubing onto the peep to try to keep it working. This got him through the hunt, but it could have cost him a deer if it had broken while he was drawing back on a buck. He also had to get to a store and buy new tubing the next day.
Another shocking component to this bow that I learned while doing the review is that it does not sustain draw weight as you decrease draw length. Be sure to look at my data charts to make sure that you will be able to use this bow at your intended specifications before you go and buy it, especially if you are planning to buy it online.
CONCLUSION
All in all I think this is a nice bow. In fact, my son is going to be using the Bear Cruzer G2 I purchased to do this testing. If you liked this review and the information I provided, you may want to check out the comparable videos I did on the Diamond Edge SB1 and the Diamond Infinite Edge Pro.
Awesome. Thanks for sharing. God bless you.
Regarding the bowmaster portable press. The new one works perfectly, you can buy brackets for that press in two sizes standard and large ( large one is wider and to fit wider limbs) both brackets are longer now than the older ones and they can fit even large cams. Ive got standard brackets and they fit my cruzer g2 perfectly. Cost of the new brackets is about 18 -25 usd depending where you buy it. Anyways great review, thanks.