Do you want to know more about the Elite Ember from an unbiased source? You’ve come to the right place. In this post, I will share with you the conclusion of the extensive testing I did on the Elite Ember. I shot the Elite Ember through a chronograph at each draw length and recorded the data below. You will also see the speed of the bow with three different arrow weights. In addition, I recorded the draw weight of the bow after each full turn of the limb bolts. This will help you know how to reach your desired draw weight based on the amount of weight that came off per turn in my testing.
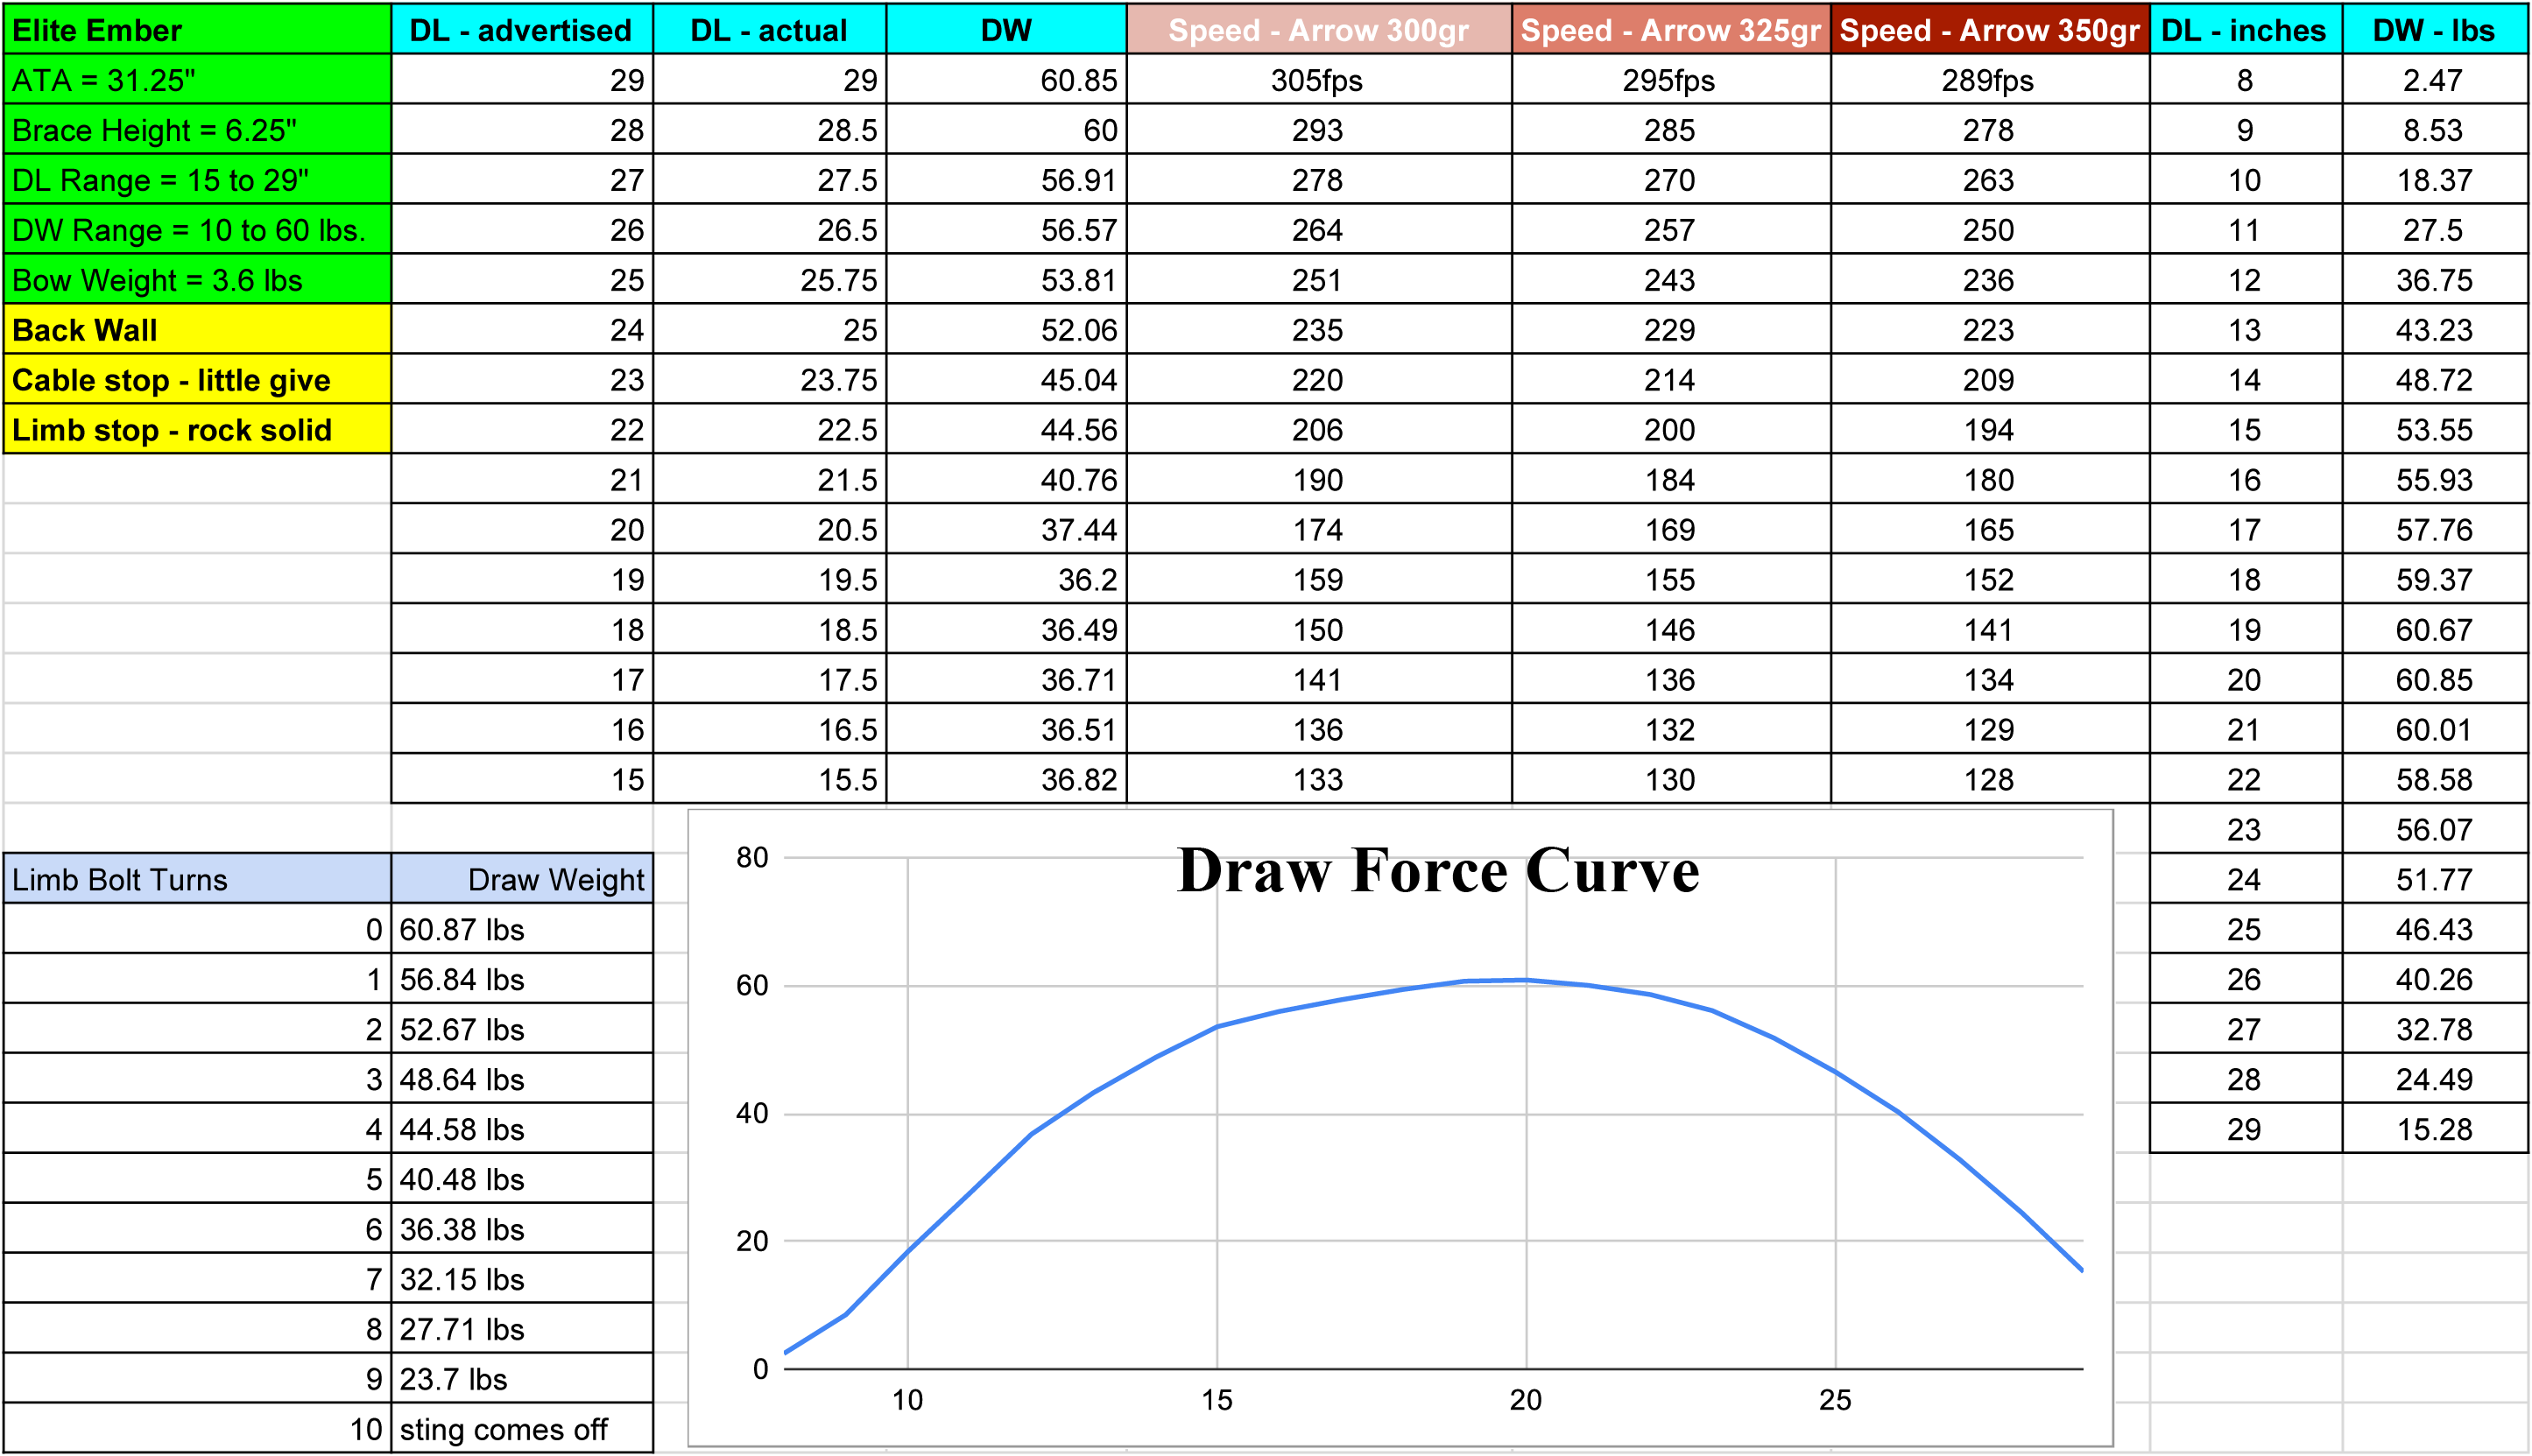
On the top left side of my data chart, you will notice a green section that gives the specifications of the exact Elite Ember that I tested. DL stands for Draw Length and DW stands for Draw Weight. ATA stands for Axle to Axle length. The specifications of this bow in the green section are followed by a yellow section. This section provides my feedback on how the back wall felt at full draw. If you are using this bow with only the cable stops, there is a little bit of give when you are at full draw. This means that when you are at full draw, you can pull harder and move the string back even farther. If you install the provided limb stops, you will have a rock-solid back wall that you can’t budge provided that your cam timing is in sync. The advantage of a rock-solid back wall is that it helps you be more accurate and consistent while shooting. The reason is that you can’t vary your draw length and draw weight by pulling farther back on some shots due to the give in the back wall that is present with only the cable stops. To further explain this detail, you will notice on the data chart that the longer the draw length is the faster the bow. Imagine reaching full draw, aiming and shooting. Then imagine pulling back again but without paying attention, you are holding back a litter harder this time. You then shoot the arrow not realizing that you were actually a quarter-inch farther back that time. This can actually increase the arrow speed which will also impact where it will hit the target. The end result is that you may be less accurate in your overall shooting. In other words, the limb stops provided on this bow is a bit of a game-changer in my opinion for bows in this price range (typically around the $500 range).
The next three columns list the advertised draw length (DL) followed by the actual draw length I measured when putting the bow on the designated settings. I noticed that my test bow measured slightly longer draw lengths than the advertised on most of the settings. You will also notice in the draw weight (DW) column that the bow decreases in draw weight as you lower the draw length, and this happens even though the limb bolts stayed all the way in as tight as they could go. Therefore, for each of the numbers you will see, the draw weight listed is the absolute maximum draw weight I was able to achieve for that given draw length. At 29 inch DL, the peak weight was 60 pounds. However, at the advertised draw length of 26 inches, my actual draw length came in at 26.5 inches and the peak weight was around 56.6 pounds. This means that if you have a draw length of around 26.5 inches, you can anticipate having a peak draw weight of around 56 pounds as opposed to 60 pounds. This is common for all of these types of bows, which is a detail I myself didn’t expect to be the case until I started doing extensive testing on all of these types of bows. In order to reach those lower draw weights advertised by the manufacturers, they need to create a module that will actually decrease in peak weight as you go down in draw length. One last thing I will point out is the draw force curve I obtained by noting the draw weight at each inch of draw length as I pulled it back with my scale on the draw board. As you can see, this bow has a very very smooth draw cycle. If you watch my compound bow review series on the flagship bows that I test each year, their curve is much more aggressive in appearance. They go up to peak weight and stay all the way up at peak weight until almost the very end of the draw cycle.
Below is the video I produced reviewing this particular bow.
When you hold this bow, it looks and feels like a higher quality bow than most of the competitor bows I have tested around this price range. In my opinion, if this bow would reach my draw length and could be at least a 5 pound higher draw weight, I would even consider making this my bow of choice if I was working on a tight budget. However, I’m a little spoiled with the discounts I get on flagship bows from various companies, some even giving me a free bow, like Elite did this year. Yes, it is true, they gave me a Kure to give away to my YouTube fans and a Rezult for me to shoot. I was grateful, but I also don’t let that impact my reviews. I just tell it to you like it is, and I think you will agree with me if you shoot this bow with the limb stops and you look at the finish, man, this bow stands out compared to many in this price range. Aside from that, the split yoke system makes it easy to tune for perfect arrow flight. I personally like to use my bow press for this. I will also be making a video on how to tune this bow at some point in the future and I will either make a separate post on how to do that or I will simply embed the video below. I haven’t decided yet. Regardless, having the split yoke system on both the top and bottom limbs makes it easy to tune. I like to use my bow press for these types of adjustments, but you can also get by without one as you can loosen the limb bolts out so far that the strings and cables become limp. The only drawback is that you will have to ensure you return to the exact same spot with both limb bolts for your adjustments to be fully effective. Anyway, two thumbs up for this bow and I am happily going to set one of my kids up with it. God bless you and thanks for checking out my review.
Leave a Reply
You must be logged in to post a comment.